Slip Tool
This is a very nice and simple tool for selecting a portion of footage of predetermined length from a clip. Once you have cut your clip down to size simply click and drag the roll tool left and right over the cut down clip. The clip will roll left and right over the footage that you'll have previously cut away, acting as a window if you like into a much longer clip. This tool is great say if you have an exact window that you know you want to fill with a certain clip but your not sure which bit of that clip you want to use.
Replace Editing
You'd use this when you want to replace a clip on your timeline with another clip that's in your viewer and yet still keep the clip that is doing the replacing, the same length as the clip that is being replaced. Firstly you need to pick the frame on the timeline that you want to correspond with the clip doing the replacing, the frame on the clip in the viewer, i.e make sure that the playhead on both the viewer and the time line are where you want the new clip to be in relation to your sequence as a whole. Secondly the length to the left and to the right of the playhead in the viewer has to be equal to or greater than the length of the clip on the left and right of the playhead on timeline that is being replaced. When you've ensured this it's as simple as dragging the clip in the viewer over to the right and into the "replace edit" box. It is important to note that when doing replace edits, in and out points on the viewer are irrelevant as replace editing creates its own in and out points.
Multi-clip Editing
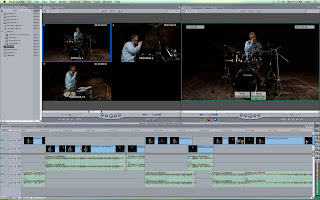
This is used when you are editing shots from two cameras or more i.e when you have a number of different angles that you are considering. Firstly you will need to make sure that all the clips are synced: both the audio and the video from all the clips appear in sync all the way through-you'll know the audio is synced if you don't hear any echo like sound when you hit play. In order to do this you make sure that that a marker marks the same point of action in all your clips. Then one simply places all the clips on the timeline, making sure their markers line up. I also might need to drag the starts of some clips so that they all start simultaneously. Next they need to be separated by right clicking on them and selecting make independent clip. Now I'm ready to make a multi-clip. I go into my browser, create a new bin and then drag my independent clips from the timeline into my bin. With both clips in the bin selected I then right click on one of the them, select create multi-clip and then depending on how I've synced them I will choose in points, out points or timecode. Then I have a multi-clip that I can drag onto my timeline. I make sure that open is selected from the sync drop down menu on the viewer and then I can make edits on the fly simply by selecting which of the angles I want as the multi-clip is playing. For even more control, when paused I can select any clip on the timeline and then click in a different angle in the viewer and that entire clip changes to that different angle! And also now that the timeline is paused I can drag clips's ins and outs left and right, ad cross dissolves e.t.c.
Below is nice little image of what things should look like. Sadly I stupidly forgot to take my own screenshot so this is straight of Google.

No comments:
Post a Comment